404 results found with an empty search
- Classic Sweet Potato Casserole (With Crunchy Pecan Topping)
There’s nothing quite like the comforting sweetness of Sweet Potato Casserole fresh out of the oven. Creamy, buttery mashed sweet potatoes topped with a golden, crunchy pecan crumble — it’s a dish that tastes like dessert but feels right at home beside the Holiday turkey . Or pair it with a Brown Sugar Glazed Ham — the sweet and savory combo makes for an unforgettable holiday spread. This is the recipe that’s been passed down in my family for years. Every Thanksgiving, the kitchen fills with the warm scent of cinnamon and toasted pecans, and someone always sneaks a bite before dinner officially starts. It’s nostalgic, cozy, and perfectly sweet — just like Grandma made it. No Southern holiday table is complete without a batch of my Caramel Pecan Sweet Rolls or a piece of Peanut Butter Fudge . Recipe Card Servings: 8 Prep Time: 15 minutes Cook Time: 35 minutes Total Time: 50 minutes Ingredients For the Sweet Potato Base: 3 cups mashed sweet potatoes (about 3–4 large sweet potatoes) ½ cup granulated sugar 2 large eggs ½ cup melted butter ⅓ cup milk 1 teaspoon vanilla extract ½ teaspoon cinnamon (optional) Pinch of salt For the Pecan Topping: ½ cup brown sugar, packed ⅓ cup all-purpose flour 4 tablespoons butter, melted 1 cup chopped pecans Instructions Preheat the Oven: Preheat your oven to 350°F . Lightly butter a 9x13-inch baking dish or medium casserole dish. Prepare the Sweet Potatoes: Peel and boil the sweet potatoes until fork-tender (about 15 minutes). Drain and mash until smooth. Mix the Base: In a large bowl, whisk together mashed sweet potatoes, sugar, eggs, melted butter, milk, vanilla, cinnamon, and salt. Mix until creamy and well combined. Add to the Dish: Spread the sweet potato mixture evenly into the prepared baking dish. Make the Pecan Topping: In a small bowl, mix brown sugar, flour, melted butter, and chopped pecans until crumbly. Sprinkle evenly over the sweet potato layer. Bake: Bake uncovered for 30–35 minutes , or until the topping is golden brown and crisp. Serve: Let cool slightly before serving. It’s delicious warm, with a touch of whipped cream or even a drizzle of maple syrup. Tips for the Best Sweet Potato Casserole Roast instead of boiling for a deeper, caramelized flavor. For a dessert version , top with mini marshmallows during the last 10 minutes of baking. You can make it ahead of time: prepare both layers separately, refrigerate, and bake just before serving. Swap pecans for walnuts or oats for a nut-free twist. A pinch of nutmeg or pumpkin pie spice adds extra warmth. Final Thoughts This Classic Sweet Potato Casserole is everything you want in a holiday side dish — rich, buttery, and sweet with the perfect crunchy topping. It’s the kind of recipe that makes everyone feel at home and goes beautifully with turkey, ham, or roasted chicken. Make it once, and it’ll be on your holiday table every year! FAQ Q: Should I use canned or fresh sweet potatoes? Both work — fresh sweet potatoes give the best texture, but canned is a great shortcut. Q: Can I make this casserole ahead of time? Yes — assemble the casserole without the topping, cover, and refrigerate for up to 24 hours. Add the topping before baking. Q: Which topping is better — marshmallows or pecan crumble? Both are traditional! Marshmallows give a classic gooey top, while pecans add a buttery crunch. You can even use both. Q: Why is my casserole watery? Too much liquid or overcooked sweet potatoes can cause moisture. Drain well and mash thoroughly. Q: Can I freeze sweet potato casserole? Yes — freeze before baking (without the topping) for up to 3 months . Bake fresh for the best texture.
- Classic Chicken and Dumplings (Hearty, Creamy, and Comforting)
When it comes to cozy comfort food, Chicken and Dumplings is as classic as it gets. Tender chunks of chicken simmered in a creamy, flavorful broth, topped with fluffy homemade dumplings — every spoonful feels like a warm hug. I grew up watching my grandma make this dish on chilly evenings, her kitchen filled with the aroma of simmering broth and fresh herbs. It’s hearty, simple, and full of love — the kind of meal that makes you slow down and savor every bite. This recipe brings that same homemade warmth to your table, with easy steps and classic flavor that never fails to impress. This Southern comfort classic pairs perfectly with creamy mashed potatoes or loaded potato soup , and a slice of Amish white bread for soaking up every drop. Recipe Card Servings: 6 Prep Time: 15 minutes Cook Time: 40 minutes Total Time: 55 minutes Ingredients For the Chicken Base: 2 tablespoons butter 1 tablespoon olive oil 1 small onion, chopped 2 carrots, peeled and sliced 2 celery stalks, sliced 2 cloves garlic, minced 1 teaspoon salt ½ teaspoon black pepper ¼ teaspoon dried thyme 1 bay leaf 6 cups chicken broth 2 cups cooked, shredded chicken (rotisserie works great) ½ cup heavy cream or milk For the Dumplings: 1 ½ cups all-purpose flour 1 tablespoon baking powder ½ teaspoon salt ¾ cup milk 3 tablespoons butter, melted Instructions Prepare the Base: In a large pot or Dutch oven, melt butter with olive oil over medium heat. Add onion, carrots, and celery. Sauté for 5–6 minutes, until softened. Add garlic and cook for another 30 seconds. Simmer the Broth: Pour in chicken broth, add thyme, bay leaf, salt, and pepper. Bring to a boil, then reduce the heat and simmer for 10 minutes to let flavors meld. Add Chicken and Cream: Stir in shredded chicken and heavy cream. Simmer gently while preparing the dumplings. Make the Dumplings: In a bowl, mix flour, baking powder, and salt. Stir in milk and melted butter until just combined — the dough should be soft and sticky. Cook the Dumplings: Drop a spoonful of dough (about a tablespoon each) onto the simmering broth. Cover the pot with a tight-fitting lid and cook on low heat for 15 minutes without lifting the lid. The dumplings will steam and become fluffy. Serve: Remove the bay leaf, taste and adjust seasoning, then ladle into bowls. Sprinkle with fresh parsley if desired. Tips for Perfect Chicken and Dumplings Don’t peek! Keep the lid closed while the dumplings cook to trap the steam. For extra richness, stir in a pat of butter or a splash of cream before serving. Want thicker broth? Mix 1 tablespoon of cornstarch with 2 tablespoons of water and stir it in before adding the dumplings. Add frozen peas, corn, or green beans for color and flavor. For a shortcut, use refrigerated biscuit dough cut into pieces for the dumplings. Final Thoughts This Classic Chicken and Dumplings recipe is pure comfort in a bowl — creamy, hearty, and filled with tender, fluffy dumplings. It’s the kind of meal that brings family together and turns any day into a cozy one. Serve it with a side of biscuits or a simple salad for the perfect homestyle dinner. FAQ Q: What type of dumplings work best — drop dumplings or rolled dumplings? Both are delicious. Drop dumplings are softer and fluffier, while rolled dumplings are firmer and more traditional in Southern cooking. Q: Can I use rotisserie chicken? Yes — using shredded rotisserie chicken makes this recipe faster and adds extra flavor. Q: Why are my dumplings dense or gummy? Overmixing the dough or simmering too hard can make the dumplings tough. Mix gently and cook on a low simmer. Q: Can I make chicken & dumplings ahead? The soup can be made ahead, but add fresh dumplings when reheating so they stay tender. Q: Can I freeze chicken & dumplings? The base freezes well, but the dumplings can become mushy. Add fresh dumplings after thawing.
- Peppermint Bark Hot Chocolate (Creamy, Festive & Irresistible)
Few things capture the magic of the holidays like a steaming cup of Peppermint Bark Hot Chocolate . It’s rich, creamy, and infused with cool peppermint — just like your favorite Christmas candy. This recipe takes classic hot cocoa and gives it a festive twist with real chocolate, a touch of vanilla, and a topping of whipped cream and crushed candy canes. It’s perfect for cozy nights by the fireplace, holiday parties, or snowy mornings when you just need something extra sweet and comforting. It’s a recipe that brings smiles to everyone — from kids sipping from candy cane straws to adults sneaking in an extra marshmallow (or two). Enjoy a mug of peppermint bark hot chocolate with gingerbread hot chocolate or salted caramel white hot chocolate . Add a classic eggnog to round out your holiday favorites. Recipe Card Servings: 2 large mugs Prep Time: 5 minutes Cook Time: 10 minutes Total Time: 15 minutes Ingredients For the Hot Chocolate: 2 cups whole milk (or any milk of choice) ½ cup heavy cream (for extra creaminess) ¼ cup semi-sweet chocolate chips 2 tablespoons cocoa powder 2 tablespoons sugar (adjust to taste) ¼ teaspoon vanilla extract ⅛ teaspoon peppermint extract For the Toppings: Whipped cream Crushed peppermint candy or candy canes Mini marshmallows (optional) Shaved chocolate (optional) Instructions Heat the Milk: In a small saucepan, combine milk and heavy cream. Warm over medium heat until hot but not boiling. Whisk in the Chocolate: Add chocolate chips, cocoa powder, and sugar. Whisk constantly until the chocolate melts and the mixture becomes smooth and creamy. Add Flavor: Stir in vanilla extract and peppermint extract. Taste and adjust the sweetness or peppermint strength as desired. Serve: Pour into mugs and top with whipped cream, crushed candy canes, and mini marshmallows. Optional Touch: Drizzle with melted chocolate or sprinkle with shaved chocolate for an extra indulgent finish. Tips for the Best Peppermint Bark Hot Chocolate For a dairy-free version , use almond or oat milk and coconut cream. Make it extra decadent by stirring in white chocolate chips. Add a splash of peppermint schnapps or Baileys for an adult version. Use a milk frother to get that café-style creamy texture. Garnish with a mini candy cane hanging on the rim for a festive touch. Final Thoughts This Peppermint Bark Hot Chocolate is pure holiday cheer in a mug — rich, creamy, and delightfully minty. It’s easy to make, endlessly customizable, and guaranteed to spread joy with every sip. Perfect for Christmas mornings, cookie exchanges, or quiet winter nights by the fire. FAQ Q: Can I use white chocolate or dark chocolate? Yes — peppermint hot chocolate works with white, milk, or dark chocolate. Choose your favorite sweetness level. Q: How do I get a strong peppermint flavor? Use crushed candy canes plus a small splash of peppermint extract. A little extract goes a long way. Q: Can I make this drink without peppermint extract? Yes — crushed mint candies or candy canes will still infuse a nice minty flavor. Q: Can I make this ahead of time? You can make the base ahead and reheat gently. Add toppings just before serving. Q: How do I keep the chocolate from burning? Warm the milk first, then melt the chocolate slowly over low heat while stirring.
- Gingerbread Hot Chocolate (Cozy, Spiced, and Perfect for the Holidays)
If you love gingerbread cookies, you’re going to fall in love with this Gingerbread Hot Chocolate . It’s smooth, rich, and perfectly spiced — like sipping a gingerbread cookie straight from the oven! This drink is a holiday must-have in my kitchen. The mix of chocolate, cinnamon, nutmeg, and ginger creates a cozy, nostalgic flavor that instantly puts you in the Christmas spirit. Top it with whipped cream, a dusting of spice, and maybe even a tiny gingerbread cookie for the ultimate festive touch. It’s perfect for holiday movie nights, Christmas morning, or any time you want to feel a little extra cozy. Sip on gingerbread hot chocolate alongside peppermint bark hot chocolate or classic eggnog . For a matching treat, try gingerbread truffles on the side. Recipe Card Servings: 2 mugs Prep Time: 5 minutes Cook Time: 10 minutes Total Time: 15 minutes Ingredients For the Hot Chocolate: 2 cups milk (whole or 2%) ½ cup heavy cream 2 tablespoons unsweetened cocoa powder ¼ cup semi-sweet chocolate chips 2 tablespoons sugar (adjust to taste) 1 tablespoon molasses ½ teaspoon ground cinnamon ¼ teaspoon ground ginger ⅛ teaspoon nutmeg ¼ teaspoon vanilla extract Pinch of salt For Serving: Whipped cream Mini marshmallows (optional) A sprinkle of cinnamon or nutmeg Mini gingerbread cookies (optional) Instructions Heat the Milk: In a saucepan over medium heat, combine milk and heavy cream. Warm until steaming, but not boiling. Add the Chocolate and Spices: Whisk in cocoa powder, chocolate chips, sugar, molasses, cinnamon, ginger, nutmeg, and a pinch of salt. Stir until the chocolate melts and the mixture is smooth and creamy. Add Vanilla: Remove from heat and stir in vanilla extract. Taste and adjust the sweetness or spice level as desired. Serve: Pour into mugs and top with whipped cream, marshmallows, or a light dusting of cinnamon. Garnish with a mini gingerbread cookie for a festive finish. Tips for the Best Gingerbread Hot Chocolate Use real molasses for that authentic gingerbread flavor — not syrup. Add a dash of espresso or coffee for a mocha twist. For a dairy-free version , use almond or oat milk and coconut cream. Make it extra rich by stirring in a spoonful of chocolate hazelnut spread . Double the batch for a crowd — it’s great for holiday brunch or cookie exchanges! Final Thoughts This Gingerbread Hot Chocolate is everything you want in a holiday drink — sweet, spiced, and full of warmth. It’s the perfect blend of comfort and celebration, ideal for sipping under twinkle lights or sharing with loved ones. Make it once, and it’ll become your new Christmas tradition! FAQ Q: Can I make this without gingerbread syrup? Yes — you can use molasses and pumpkin pie spice or a homemade mix of cinnamon, ginger, nutmeg, and cloves for the same cozy flavor. Q: What type of chocolate works best? Semi-sweet or dark chocolate gives the richest flavor, but milk chocolate works for a sweeter drink. Q: Can I make this dairy-free? Absolutely — use oat milk, almond milk, or coconut milk. Choose dairy-free chocolate for a fully vegan version. Q: Can I make a big batch for parties? Yes — warm everything in a slow cooker on LOW for 2–3 hours, stirring occasionally. Q: What toppings go best with gingerbread hot chocolate? Whipped cream, mini marshmallows, caramel drizzle, or a sprinkle of cinnamon or gingerbread crumbs.
- Salted Caramel White Hot Chocolate (Rich, Creamy & Indulgent)
If you love caramel and white chocolate, this Salted Caramel White Hot Chocolate will make your heart melt. It’s rich, silky, and perfectly balanced — sweet and creamy with just the right touch of salt. This is my go-to drink when I want something cozy and luxurious. The white chocolate melts beautifully into the milk, while the caramel adds depth and buttery flavor. Top it with whipped cream, a caramel drizzle, and a sprinkle of flaky sea salt — it’s a drink that feels as special as dessert, but easy enough for every chilly day. This sweet, creamy drink pairs perfectly with classic eggnog or gingerbread hot chocolate , and peppermint bark hot chocolate makes a great finishing touch. Recipe Card Servings: 2 mugs Prep Time: 5 minutes Cook Time: 10 minutes Total Time: 15 minutes Ingredients For the Hot Chocolate: 2 cups whole milk (or milk of choice) ½ cup heavy cream ½ cup white chocolate chips (or chopped white chocolate bar) 2 tablespoons caramel sauce (plus more for topping) 1 tablespoon sugar (optional, adjust to taste) ½ teaspoon vanilla extract Pinch of sea salt For Topping: Whipped cream Caramel drizzle Flaky sea salt or coarse sugar White chocolate shavings (optional) Instructions Warm the Milk: In a small saucepan, combine milk and heavy cream. Heat over medium-low until hot but not boiling. Add Chocolate and Caramel: Stir in white chocolate chips and caramel sauce. Whisk continuously until the chocolate melts and the mixture is smooth and creamy. Flavor It: Add vanilla extract and a pinch of sea salt. Taste and adjust sweetness or salt as needed. Serve: Pour into mugs and top with whipped cream, a drizzle of caramel, and a sprinkle of flaky salt. Add white chocolate shavings for an extra touch of indulgence. Tips for the Best Salted Caramel White Hot Chocolate Use good-quality white chocolate — it makes all the difference. For extra richness, add a splash of sweetened condensed milk . Swap caramel for dulce de leche for a deeper flavor. Add a shot of espresso or Baileys for an adult version. Use coarse sea salt flakes on top — they balance the sweetness perfectly. Final Thoughts This Salted Caramel White Hot Chocolate is cozy, creamy, and utterly indulgent — the perfect drink to warm up a cold day or impress guests during the holidays. It’s like sipping pure comfort from a mug! FAQ Q: Can I use white chocolate chips instead of a chocolate bar? Yes — high-quality white chocolate chips melt smoothly and work perfectly in this drink. Q: How do I make the caramel flavor stronger? Add extra caramel sauce or a splash of caramel extract. A pinch of sea salt enhances the flavor. Q: Can I make this dairy-free? Yes — use dairy-free white chocolate and your favorite plant-based milk like oat or coconut milk. Q: Can I make this in a slow cooker? Absolutely — heat on LOW for 1–2 hours, stirring occasionally, until the chocolate melts and the drink is creamy. Q: What toppings are best? Whipped cream, caramel drizzle, white chocolate shavings, or a sprinkle of sea salt.
- Classic Homemade Eggnog (Rich, Creamy & Perfectly Spiced)
No drink says holiday season quite like a creamy glass of homemade eggnog . Rich, velvety, and perfectly spiced with nutmeg and vanilla, this festive classic evokes the essence of Christmas in a cup. Whether you serve it chilled at a party or warm it gently by the fire, this recipe brings all the nostalgic charm of old-fashioned eggnog — without the store-bought sweetness. It’s simple, smooth, and absolutely delicious. This version uses cooked eggs for safety, while maintaining the traditional flavor and silky texture everyone loves. Add a splash of rum or bourbon if you’d like a grown-up twist, or keep it alcohol-free for the whole family. For a cozy drink lineup, try gingerbread hot chocolate or peppermint bark hot chocolate next, or make the mistletoe kiss cocktail for something festive and bubbly. Recipe Card Servings: 6 Prep Time: 10 minutes Cook Time: 15 minutes Chill Time: 1 hour Total Time: 1 hour 25 minutes Ingredients For the Eggnog: 6 large egg yolks ½ cup granulated sugar 2 cups whole milk 1 cup heavy cream ½ teaspoon ground nutmeg (plus more for topping) 1 teaspoon vanilla extract Pinch of salt Optional Add-Ins: ½ cup bourbon, dark rum, or brandy (optional for adult version) Whipped cream for serving Instructions Whisk the Yolks: In a medium bowl, whisk together egg yolks and sugar until the mixture is pale and creamy. Heat the Milk: In a saucepan, combine milk, cream, nutmeg, and salt. Warm over medium heat until hot but not boiling. Temper the Eggs: Slowly pour about ½ cup of the hot milk mixture into the egg yolks, whisking constantly to prevent the eggs from curdling. Then, gradually pour the tempered egg mixture back into the saucepan. Cook the Eggnog: Cook on low heat, stirring constantly, until the mixture thickens slightly and coats the back of a spoon (about 160°F. Do not boil. Add Vanilla and Chill: Remove from heat and stir in vanilla extract. If using alcohol, stir it in now. Pour through a fine strainer into a pitcher and refrigerate until chilled, at least 1 hour. Serve: Pour into glasses, top with whipped cream and a dusting of nutmeg. Serve chilled or gently warmed. Tips for the Best Eggnog Temper the eggs slowly — this step helps maintain a silky smooth texture. For a thicker drink, whisk in an extra yolk or reduce the milk slightly. Want it extra frothy? Blend before serving. Store in the refrigerator for up to 3 days . Garnish with cinnamon sticks or star anise for a festive look. Final Thoughts This Classic Eggnog is the perfect blend of creamy, sweet, and spiced — a true holiday favorite that brings warmth and cheer with every sip. Serve it at Christmas brunch, cozy winter gatherings, or as a late-night treat by the fire. FAQ Q: Can I make eggnog without alcohol? Yes — classic eggnog is delicious with or without alcohol. Simply skip the rum, bourbon, or brandy for a family-friendly version. Q: Is it safe to drink eggnog with raw eggs? Most homemade eggnog recipes gently cook the eggs with milk until they reach 160°F , which makes the mixture safe to consume. If you prefer, you can also use pasteurized eggs. Q: Can I make eggnog ahead of time? Absolutely — eggnog tastes even better after chilling overnight. The flavors blend and become richer. Q: What alcohol is best for eggnog? Bourbon, aged rum, brandy, or a mix of rum + bourbon adds classic Christmas flavor. Add to taste. Q: How do I make eggnog thicker? Simmer the custard slightly longer, or whisk in a bit more cream. Chill thoroughly — eggnog thickens as it cools. Q: Can I make dairy-free eggnog? Yes — use coconut milk, almond milk, or oat milk and sweeten to taste. Coconut milk gives the creamiest texture. Q: How long does homemade eggnog last? Refrigerate in a sealed container for 3–4 days . Shake or stir before serving.
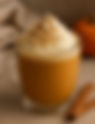
- Homemade Pumpkin Spice Latte (Creamy, Cozy & Better Than the Coffee Shop!)
When autumn rolls around, there’s one drink that defines the season — the Pumpkin Spice Latte . With its rich espresso, velvety milk, and warm blend of cinnamon, nutmeg, and cloves, it’s like a hug in a mug. This homemade version uses real pumpkin purée for authentic flavor and natural sweetness. It’s easy, cozy, and much more budget-friendly than the coffee shop version — plus, your kitchen will smell like fall heaven while you make it. Whether you’re sipping it on a crisp morning or wrapping up in a blanket on a chilly evening, this drink brings the perfect mix of comfort and indulgence. This creamy latte goes perfectly with gingerbread hot chocolate or salted caramel white hot chocolate , and it pairs beautifully with classic carrot cake for fall mornings. Recipe Card Servings: 2 mugs Prep Time: 5 minutes Cook Time: 10 minutes Total Time: 15 minutes Ingredients For the Latte: 2 cups milk (whole, oat, or almond milk works well) 2 tablespoons pumpkin purée 1–2 tablespoons sugar (adjust to taste) ½ teaspoon pumpkin pie spice (plus more for topping) ¼ teaspoon cinnamon ½ teaspoon vanilla extract ½ cup strong brewed coffee or 2 shots of espresso For Topping: Whipped cream Pumpkin pie spice or cinnamon sprinkle Instructions Heat the Pumpkin and Spices: In a small saucepan over medium heat, whisk together pumpkin purée, sugar, pumpkin pie spice, and cinnamon. Cook for 1–2 minutes until the mixture is hot and fragrant. Add Milk and Vanilla: Whisk in milk and vanilla. Heat until steaming but not boiling, whisking often to keep it smooth. Blend (Optional): For extra froth, use an immersion blender or transfer to a blender and blend until foamy. Add Coffee: Pour in hot coffee or espresso and stir together. Serve: Pour into mugs, top with whipped cream, and dust with pumpkin pie spice or cinnamon. Tips for the Best Pumpkin Spice Latte Use real pumpkin purée , not pumpkin pie filling. For extra depth, add a small splash of maple syrup instead of sugar. Make it iced : pour over ice and top with cold foam. For a dairy-free version, use oat milk and coconut whipped cream. Double the batch — it reheats beautifully for busy mornings! Final Thoughts This Homemade Pumpkin Spice Latte is everything we love about fall — cozy, creamy, and filled with warm spices. It’s quick to make, irresistibly good, and the perfect way to start your morning or wind down your day. Skip the line, make it at home, and enjoy every sip of autumn! FAQ Q: Can I make this latte without an espresso machine? Yes — use strong brewed coffee or instant espresso powder mixed with hot milk. Q: Can I use homemade pumpkin puree? Absolutely — it gives a fresher, richer flavor, but canned pumpkin also works perfectly. Q: How do I make it dairy-free? Use oat milk, almond milk, coconut milk, or soy milk, and choose a dairy-free whipped topping if desired. Q: Can I adjust the sweetness? Yes — add more or less sugar, maple syrup, or pumpkin spice syrup depending on your taste. Q: Can I make a large batch for parties? Definitely — multiply ingredients and keep warm in a slow cooker for easy serving.
- Lazy French Onion Soup (Simple, Cozy & Full of Flavor)
There’s nothing quite like a steaming bowl of French Onion Soup — rich, golden broth filled with sweet caramelized onions and topped with gooey melted cheese. But making it the traditional way can take hours. That’s where this Lazy French Onion Soup comes in. You’ll get all the deep, savory flavor of the original with half the effort — no endless stirring required. It’s cozy, delicious, and perfect for when you’re craving comfort but don’t want to spend the whole evening at the stove. Serve this cozy soup with garlic herb pull-apart bread or tomato soup and grilled cheese casserole . For an easy party starter, add creamy crack dip to the table. Recipe Card Servings: 4 Prep Time: 10 minutes Cook Time: 35 minutes Total Time: 45 minutes Ingredients 3 tablespoons butter 1 tablespoon olive oil 3 large yellow onions, thinly sliced 1 teaspoon sugar ½ teaspoon salt ½ teaspoon dried thyme (or a few fresh sprigs) 2 cloves garlic, minced 1 tablespoon flour 5 cups beef broth (or vegetable broth) 1 tablespoon Worcestershire sauce (optional, for depth) ½ teaspoon black pepper 1 baguette or crusty bread, sliced 1 ½ cups shredded Gruyère or Swiss cheese Instructions Caramelize the Onions (the easy way): Melt butter and olive oil in a large pot over medium heat. Add onions, sugar, and salt. Cook for 15–20 minutes , stirring occasionally, until onions are golden and soft (don’t worry if they brown a little — that adds flavor!). Add Flavor: Stir in garlic and thyme; cook 1 minute. Sprinkle in flour and stir for another minute to thicken slightly. Add Broth: Pour in beef broth and Worcestershire sauce. Stir well, scraping any browned bits from the bottom. Simmer for 10–15 minutes to let flavors blend. Season with pepper to taste. Prepare the Toasts: While the soup simmers, toast the baguette slices in the oven at 400°F until golden, about 5 minutes per side. Assemble & Serve: Ladle hot soup into oven-safe bowls. Top each with a slice (or two) of toasted bread and sprinkle generously with cheese. Broil for 2–3 minutes until the cheese melts and bubbles. Serve immediately! Tips for the Best Lazy French Onion Soup Use store-bought broth — just add a splash of Worcestershire and thyme for richness. No oven-safe bowls? Melt the cheese separately on toast and place on top of the soup. A splash of balsamic vinegar or sherry adds extra depth of flavor. Make it vegetarian by using mushroom broth instead of beef. Caramelize a big batch of onions and freeze for future soups or sauces. Final Thoughts This Lazy French Onion Soup delivers all the comfort and flavor of the classic with none of the fuss. It’s savory, cheesy, and deeply satisfying — the perfect bowl for cozy nights, simple dinners, or impressing guests without the extra work. Pair it with a fresh green salad or a side of crusty bread for the ultimate comforting meal. FAQ Q: What makes this “lazy” French onion soup? It uses shortcut methods like pre-sliced onions or faster caramelizing techniques to deliver the same rich flavor with a fraction of the effort. Q: Can I use yellow or white onions? Yes — yellow onions give the most traditional flavor, but white or sweet onions also work beautifully. Q: How do I get a deep caramelized flavor quickly? Cook the onions low and slow, or add a splash of balsamic vinegar or Worcestershire sauce to boost richness. Q: Can I make this soup ahead of time? Absolutely — onion soup tastes even better the next day as the flavors intensify. Q: What cheese is best for French onion soup? Gruyère is classic, but Swiss, mozzarella, or provolone work perfectly too.
- Easy Dump Cake (Only 5 Ingredients & So Delicious!)
Sometimes you need a dessert that’s warm, comforting, and effortless . Enter the Dump Cake — a vintage favorite that’s as simple as it sounds. No mixing, no fuss — just “dump” everything into the pan and bake! This version has all the buttery, fruity sweetness you love from cobblers or crisps but takes half the time. With juicy fruit filling, fluffy cake layers, and a golden, buttery crust, it’s pure comfort in every bite. Whether you’re hosting a family gathering or craving something sweet on a weeknight, this cake delivers — easy, quick, and irresistibly good. If you love easy, cozy desserts, try my Old-Fashioned Chocolate Fudge , Classic Apple Crisp , or Southern Sweet Potato Pie next. Recipe Card Servings: 8–10 Prep Time: 5 minutes Cook Time: 45 minutes Total Time: 50 minutes Ingredients 1 (21 oz) can of cherry pie filling (or any fruit pie filling you love) 1 (20 oz) can crushed pineapple, undrained 1 box yellow cake mix ¾ cup butter (1 ½ sticks), melted ½ cup chopped pecans or walnuts (optional) Instructions Preheat the Oven: Preheat your oven to 350°F . Lightly grease a 9x13-inch baking dish. Layer the Fruit: Pour the crushed pineapple (with juice) into the baking dish and spread evenly. Spoon the cherry pie filling over the top. Add the Cake Mix: Sprinkle the dry cake mix evenly over the fruit — do not stir. Add the Butter: Drizzle melted butter evenly over the top of the cake mix, covering as much of the surface as possible. Top and Bake: Sprinkle with chopped nuts if desired. Bake for 40–45 minutes , or until the top is golden brown and bubbly around the edges. Serve: Let cool slightly before serving. Enjoy warm with whipped cream or a scoop of vanilla ice cream! Tips for the Best Dump Cake Try different flavor combos : apple filling with spice cake mix, blueberry with vanilla, or peach with white cake mix. Use butter slices instead of melted butter for an extra crisp texture. Add a sprinkle of brown sugar and cinnamon before baking for more depth. Store leftovers in the refrigerator and reheat in the oven or microwave. It’s great served warm or chilled — equally delicious either way! Final Thoughts This Easy Dump Cake proves that you don’t need fancy ingredients to make something truly delicious. It’s sweet, buttery, and oh-so-simple — the perfect dessert for holidays, potlucks, or cozy nights at home. FAQ Q: What is a dump cake? A dump cake is an easy dessert where you simply “dump” the ingredients into a baking dish — usually fruit, cake mix, and butter — with no mixing required. Q: Can I use fresh fruit instead of canned? Yes — fresh fruit works great. Just add ¼–½ cup of sugar (depending on sweetness) and a splash of lemon juice so the filling bakes properly. Q: Do I have to stir the ingredients together? No, traditional dump cake is not mixed . Keeping the layers separate helps the top become buttery, crumbly, and crisp. Q: Can I make dump cake with different cake mix flavors? Absolutely! White, yellow, chocolate, spice cake, or even lemon cake mix all work beautifully, depending on the fruit you use. Q: How do I keep the top from being dry? Make sure the butter is evenly distributed across the top — thin slices or melted butter help the cake mix fully absorb. Q: How long does dump cake last? Refrigerate leftovers for 3–4 days . Warm in the oven or microwave before serving.
- Classic Chocolate Cake (Moist, Rich & Perfect Every Time)
There’s nothing quite like a slice of homemade chocolate cake — soft, rich, and perfectly sweet. It’s a dessert that never goes out of style, whether you’re celebrating a birthday, hosting guests, or simply treating yourself to something special. This recipe delivers everything you want in a classic cake: a moist crumb, deep chocolate flavor, and a smooth, luscious frosting that melts in your mouth. It’s easy to make, bakes beautifully, and turns any day into a celebration. Satisfy your chocolate craving with classic carrot cake or chocolate fudge . New York-style cheesecake adds a creamy balance to your dessert tray. Recipe Card Servings: 10–12 slices Prep Time: 15 minutes Cook Time: 35 minutes Total Time: 50 minutes Ingredients For the Cake: 1 ¾ cups all-purpose flour ¾ cup unsweetened cocoa powder 1 ½ teaspoons baking powder 1 ½ teaspoons baking soda ½ teaspoon salt 2 cups granulated sugar 2 large eggs 1 cup buttermilk ½ cup vegetable oil 2 teaspoons vanilla extract 1 cup hot water (or hot coffee for deeper flavor) For the Frosting: ½ cup (1 stick) butter, softened ⅔ cup unsweetened cocoa powder 3 cups powdered sugar ⅓ cup milk (more if needed) 1 teaspoon vanilla extract Instructions Preheat the Oven: Preheat your oven to 350°F . Grease and flour two 9-inch round cake pans (or line with parchment paper). Mix the Dry Ingredients: In a large bowl, whisk together flour, cocoa powder, baking powder, baking soda, and salt. Add the Wet Ingredients: Stir in sugar, eggs, buttermilk, oil, and vanilla until smooth. Slowly add the hot water (or coffee) and mix until fully combined. Batter will be thin — that’s what makes it moist! Bake: Divide the batter evenly between the two pans. Bake for 30–35 minutes , or until a toothpick inserted in the center comes out clean. Cool in pans for 10 minutes, then transfer to a wire rack to cool completely. Make the Frosting: Beat butter and cocoa powder together until creamy. Gradually add powdered sugar and milk, alternating between the two. Mix in vanilla extract and beat until smooth and spreadable. Assemble: Place one cake layer on a plate, spread frosting over the top, then add the second layer. Frost the top and sides, smoothing evenly. Tips for the Best Chocolate Cake Use hot coffee instead of water — it enhances the chocolate flavor. Don’t overmix — stop as soon as the ingredients are combined. For extra decadence, add a layer of ganache or chocolate chips between the cakes. Store at room temperature for up to 3 days or refrigerate for longer freshness. This cake freezes beautifully — just wrap tightly in plastic and foil. Final Thoughts This Classic Chocolate Cake is pure indulgence — soft, rich, and beautifully balanced. It’s the kind of dessert that brings joy to any table and never fails to impress. Serve it with a cold glass of milk, a cup of coffee, or a big scoop of vanilla ice cream for the perfect finish. FAQ Q: What makes this chocolate cake so moist? Using oil instead of butter, plus ingredients like buttermilk or hot coffee, keeps the cake incredibly soft. Q: Can I substitute cocoa powder types? Yes — natural or Dutch-processed cocoa powder both work, but Dutch gives a richer, darker flavor. Q: Why did my cake sink in the middle? It may have been underbaked, overmixed, or the oven door may have been opened too early. Q: Can I make this cake ahead? Absolutely — chocolate cake layers freeze beautifully for up to 2 months . Wrap tightly and thaw before frosting. Q: What frosting tastes best with classic chocolate cake? Chocolate buttercream, whipped ganache, or cream cheese frosting are all delicious choices.
- Classic Hummingbird Cake (Moist, Sweet & Southern-Style Perfection)
If comfort had a flavor, it would taste like Hummingbird Cake — a moist, spiced layer cake filled with ripe bananas, crushed pineapple, and chopped pecans, all wrapped up in rich cream cheese frosting. Originally from the South, this cake has been a beloved tradition for generations. It’s sweet, fragrant, and beautifully old-fashioned — the kind of dessert that brings people together around the table. Whether it’s for a Sunday dinner, Easter brunch, or just because you need something special, this cake never fails to impress. Serve this moist cake with classic carrot cake or chocolate cake for a beautiful dessert table. For gatherings, pair it with baked brie and cranberries. Recipe Card Servings: 10–12 Prep Time: 20 minutes Cook Time: 30 minutes Total Time: 50 minutes Ingredients For the Cake: 3 cups all-purpose flour 2 cups granulated sugar 1 teaspoon baking soda 1 teaspoon cinnamon ½ teaspoon salt 3 large eggs 1 cup vegetable oil 1 ½ teaspoons vanilla extract 1 (8 oz) can crushed pineapple, undrained 2 cups mashed ripe bananas (about 3–4 bananas) 1 cup chopped pecans For the Cream Cheese Frosting: 8 oz cream cheese, softened ½ cup (1 stick) butter, softened 4 cups powdered sugar 1 teaspoon vanilla extract Instructions Preheat the Oven: Preheat the oven to 350°F . Grease and flour three 9-inch round cake pans. Combine Dry Ingredients: In a large bowl, whisk together flour, sugar, baking soda, cinnamon, and salt. Add Wet Ingredients: Stir in eggs, oil, and vanilla until just moistened. Fold in mashed bananas, pineapple (with juice), and chopped pecans. Mix gently until well combined — do not overmix. Bake: Divide the batter evenly between the pans. Bake for 25–30 minutes or until a toothpick inserted in the center comes out clean. Cool in pans for 10 minutes, then transfer to wire racks to cool completely. Make the Frosting: Beat cream cheese and butter together until smooth. Gradually add powdered sugar, beating until fluffy. Mix in vanilla extract. Assemble the Cake: Place one cake layer on a stand and spread with frosting. Repeat with remaining layers, finishing with a smooth top and sides. Garnish with extra pecans if desired. Tips for the Best Hummingbird Cake Use ripe bananas for maximum flavor and moisture. Don’t drain the pineapple — the juice keeps the cake tender. Toast your pecans for a richer, nuttier flavor. Chill the cake for 30 minutes before slicing for cleaner layers. This cake tastes even better the next day after the flavors have melded. Final Thoughts This Classic Hummingbird Cake is pure Southern comfort — sweet, fruity, and perfectly spiced. It’s a cake that feels like home, loved by generations, and perfect for any celebration. Serve it with a cup of coffee or sweet tea, and watch it disappear slice by slice. FAQ Q: Why is it called Hummingbird Cake? It originated in the South and is named for its sweet, irresistible flavor — just like something hummingbirds would love! Q: Do I need to drain the crushed pineapple? No — use the pineapple with its juice for the best moisture and texture. Q: Can I make this cake without nuts? Absolutely — pecans are traditional but completely optional. Q: Why is my hummingbird cake dense? Overmixing the batter or packing the flour too tightly can make it dense. Stir gently until just combined. Q: Does hummingbird cake need to be refrigerated? Yes — because of the cream cheese frosting. Store up to 5 days in the fridge.
- German Chocolate Cake (Moist, Rich & Filled with Coconut-Pecan Frosting)
Few cakes have stood the test of time quite like German Chocolate Cake — a rich, tender chocolate layer cake filled and topped with its signature coconut-pecan frosting. Despite its name, this classic dessert isn’t from Germany at all, but traces back to Samuel German, the American chocolatier whose chocolate inspired this beloved recipe. Every bite is pure indulgence — moist chocolate cake layered with sweet coconut, toasted pecans, and rich caramel-like notes that melt together beautifully. A longtime Southern favorite, German Chocolate Cake is perfect for birthdays, holidays, and family gatherings. Serve it alongside Coconut Snowball Cookies , Mini Pecan Pies , or a slice of Coconut Cream Pie for a dessert spread that feels nostalgic, comforting, and truly special. Recipe Card Servings: 10–12 Prep Time: 25 minutes Cook Time: 30 minutes Cooling/Frosting Time: 1 hour Total Time: 1 hour 55 minutes. Nutrition Estimate (Per Slice) Approximate values, based on 12 slices. Actual values may vary by portion size and frosting thickness. Calories: 480–540 Protein: 6–7g Fat: 28–32g Carbohydrates: 55–62g Fiber: 4g Sugar: 38–45g Ingredients For the Cake: 1 (4 oz) bar German’s sweet chocolate (or semi-sweet baking chocolate) ½ cup boiling water 2 cups all-purpose flour 1 teaspoon baking soda ¼ teaspoon salt 1 cup (2 sticks) butter, softened 2 cups sugar 4 large eggs, separated 1 teaspoon vanilla extract 1 cup buttermilk For the Coconut-Pecan Frosting: 1 cup evaporated milk 1 cup sugar 3 egg yolks, beaten ½ cup butter 1 teaspoon vanilla extract 1 ⅓ cups sweetened shredded coconut 1 cup chopped pecans Instructions Preheat the Oven: Preheat your oven to 350°F . Grease and flour three 9-inch round cake pans or line them with parchment circles. Melt the Chocolate: Break the chocolate into pieces and melt it in boiling water. Stir until smooth and set aside to cool slightly. Mix the Batter: In a medium bowl, whisk together flour, baking soda, and salt. In a large mixing bowl, beat butter and sugar until light and fluffy. Add egg yolks, one at a time, beating well after each. Stir in the melted chocolate and vanilla. Combine and Bake: Alternately add the flour mixture and buttermilk, beginning and ending with flour. In a separate bowl, beat egg whites until stiff peaks form, then gently fold them into the batter. Divide evenly among the pans. Bake for 30–35 minutes , or until a toothpick inserted in the center comes out clean. Cool completely before frosting. Make the Frosting: In a saucepan, combine evaporated milk, sugar, egg yolks, butter, and vanilla. Cook over medium heat, stirring constantly, until thickened (about 10 minutes). Remove from heat and stir in coconut and pecans. Cool before spreading. Assemble the Cake: Place one cake layer on a stand, spread with frosting. Repeat with the next two layers, finishing with frosting on top. Traditionally, the sides are left unfrosted. Tips for the Best German Chocolate Cake Don’t overbake — this cake stays tender and moist when baked just until set. For a deeper flavor, use espresso powder or dark chocolate instead of German’s sweet. Chill the frosting slightly before spreading — it thickens as it cools. Toast the pecans and coconut for an extra nutty aroma. Store covered at room temperature for up to 2 days or refrigerate for up to 5. Final Thoughts This German Chocolate Cake is rich, indulgent, and layered with nostalgic flavor. It’s the perfect dessert to share with family and friends — comforting, impressive, and absolutely delicious. Serve it with a cup of coffee or a scoop of vanilla ice cream for the ultimate sweet ending. FAQ Q: What makes German chocolate cake different from regular chocolate cake? German chocolate cake uses a lighter, sweeter chocolate and is topped with a rich coconut-pecan frosting that gives it its signature flavor. Q: Can I make the frosting ahead of time? Yes — the coconut-pecan frosting can be made 1–2 days ahead and stored in the refrigerator. Bring to room temperature before spreading. Q: Why is my frosting runny? It likely wasn’t cooked long enough. Simmer until the mixture thickens and coats the back of a spoon. Q: Can I use regular cocoa powder instead of German chocolate? You can, but it changes the flavor. German chocolate gives a milder, sweeter taste. Q: Does German chocolate cake need to be refrigerated? Yes — because of the egg-based frosting. Refrigerate for up to 4–5 days.